Used Car Inspection Tips: What To Check Before You Buy One
Buying a used car can save you thousands compared to a new vehicle, but only if you avoid purchasing someone else's problem. That's where used car inspection tips come in. Knowing exactly what to look for, before you sign anything, can mean the difference between driving home in a reliable ride and inheriting expensive mechanical issues.
The truth is, some sellers (private and dealers alike) won't volunteer information about past accidents, hidden rust, or worn-out components. Your eyes and a systematic approach are your best defense against costly surprises. Even if a car looks perfect in photos or under showroom lights, underlying issues can lurk beneath the surface, waiting to drain your wallet.
At Certified AutoBrokers, we inspect every vehicle we sell because we know how much this step matters. But whether you're shopping with us in Grand Island, NY, browsing lots across Western New York, or considering a car from a private seller, you should know how to evaluate a used car yourself. This guide walks you through a complete pre-purchase inspection checklist, covering the exterior, interior, under the hood, and behind the wheel, so you can spot red flags and buy with confidence.
Get ready before you see the car
Walking onto a lot or arriving at a seller's location without preparation puts you at a disadvantage. You need to arm yourself with information and the right tools before you inspect any used vehicle. This groundwork helps you ask targeted questions, spot inconsistencies, and negotiate from a position of knowledge rather than guessing whether you're getting a fair deal.
Research the vehicle history first
You should always run a vehicle history report using the VIN (vehicle identification number) before you physically inspect a car. Services like Carfax or AutoCheck reveal accident history, title issues, odometer fraud, and service records that sellers might conveniently forget to mention. Ask the seller for the VIN ahead of time, usually found on the dashboard near the windshield or on the driver's side door jamb.
Pay special attention to reported accidents with structural or frame damage, salvage titles, flood damage, and inconsistent odometer readings. Even minor fender benders can hide underlying alignment or suspension problems that will cost you later. A clean title and consistent service history don't guarantee a perfect car, but they significantly reduce your risk.
A vehicle history report is your first line of defense against buying a lemon, revealing problems the seller won't advertise.
Look for maintenance patterns that suggest neglect or care. A car with regular oil changes every 3,000 to 5,000 miles likely received better overall maintenance than one with 20,000-mile gaps between services. You can also cross-reference the seller's claims about recent repairs with documented service records.
Gather your inspection toolkit
Showing up empty-handed limits what you can actually inspect. Instead, bring a small toolkit that helps you examine areas most buyers overlook. You don't need professional diagnostic equipment, but a few simple items give you a significant advantage over someone who relies only on their eyes.
Essential items to bring:
- Flashlight (bright LED model for under-hood and undercarriage inspection)
- OBD-II scanner (reads engine diagnostic codes, available for $20-$100)
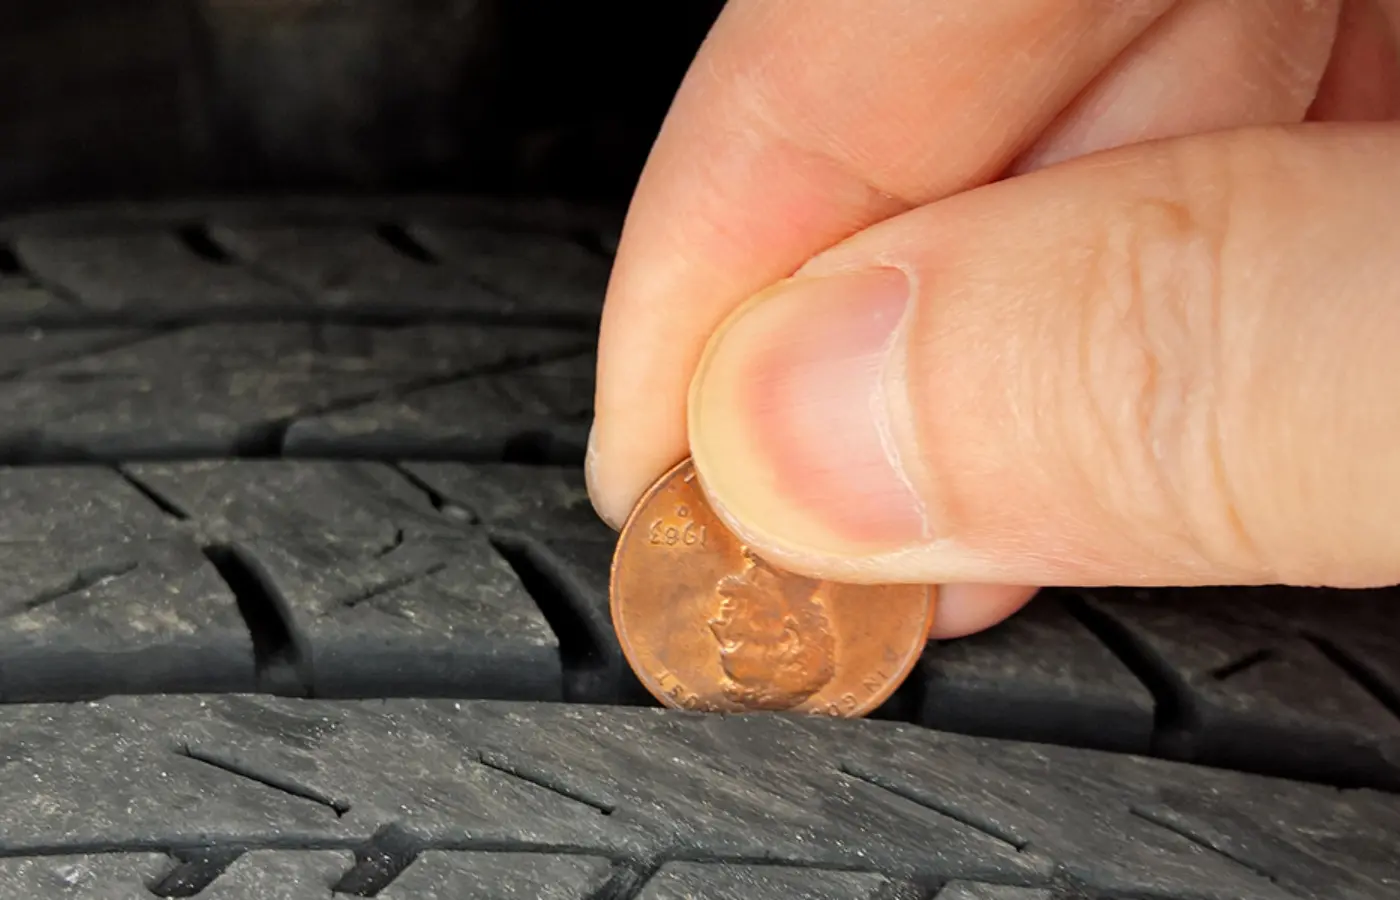
- Tire tread depth gauge (or use the penny test)
- Inspection mirror (to check hidden rust spots and undercarriage)
- Magnet (wrapped in cloth to detect body filler under paint)
- Paper towels or rag (for checking fluid levels and conditions)
- Notebook and pen (to document findings and VIN details)
- Your smartphone (for photos, video, and comparing prices)
An OBD-II scanner plugs into the port under the dashboard and reveals current and stored error codes that might not trigger the check engine light yet. You simply turn the ignition to "on" without starting the engine, plug in the scanner, and read any codes that appear. This takes 30 seconds and can expose transmission issues, sensor failures, or emission problems worth hundreds in repairs.
Create your inspection checklist
Walking through an inspection without a written checklist means you'll forget critical items when you're excited about a car or pressured by a seller. Download or print a systematic checklist that covers every major component so you can work methodically, even if the seller tries to rush you.
Pre-inspection checklist template:
USED CAR INSPECTION CHECKLIST

Basic Information:
□ Year, Make, Model: ________________
□ VIN: ________________
□ Odometer reading: ________________
□ Asking price: ________________

Before Arrival:
□ Vehicle history report reviewed
□ Fair market value researched
□ Comparable listings checked
□ Seller questions prepared
□ Inspection toolkit assembled
□ Pre-purchase inspection shop identified

Questions to Ask Seller:
□ Why are you selling this car?
□ What repairs have you made in the last year?
□ Has it been in any accidents?
□ Are there any known mechanical issues?
□ Do you have maintenance records?
□ Is the title clear?
□ Can I take it for a pre-purchase inspection?
Schedule your inspection during daylight hours when you can see paint imperfections, rust, and fluid leaks clearly. Artificial lot lighting deliberately masks defects, and you need natural sunlight to spot color mismatches from repainting after accidents. Try to inspect the car when it's cold (hasn't been driven recently) because cold engines reveal starting problems and leaks that warm engines hide.
Check the exterior and tires in minutes
Your exterior inspection reveals whether a car has been properly maintained or hastily repaired to hide damage. These used car inspection tips for the body and tires take only minutes but can expose thousands of dollars in hidden bodywork, rust issues, or safety hazards. You should examine the car in direct sunlight from multiple angles, including crouching down to see reflections that highlight dents, waves, or color mismatches in the paint.
Walk around and look for paint inconsistencies
You need to circle the entire vehicle slowly while looking at each panel from different angles. Factory paint shows consistent color, texture, and reflection across all body panels, but repainted sections after accidents often reveal slight color variations or orange-peel texture (uneven surface that looks like orange skin). Run your hand along panel gaps between doors, fenders, and the hood to feel for uneven spacing or misalignment that signals poor repair work.
What to examine on each panel:
- Door gaps (should be uniform across all doors, typically 3-5mm)
- Hood and trunk alignment (should sit flush when closed)
- Paint overspray on rubber seals, glass edges, or plastic trim
- Ripples or waves in metal panels (indicates body filler underneath)
- Color matching between adjacent panels (check in sunlight)
- Clear coat peeling or fading (especially on roof and hood)
Test suspicious areas with your cloth-wrapped magnet by gently placing it on the panel. The magnet sticks firmly to metal but slides off or falls away from thick body filler used to hide dents or rust repairs. You're not looking for perfection on a used car, but extensive filler across multiple panels means serious accident damage that could affect structural integrity.
Check for rust in hidden spots
Surface rust on exhaust components might be normal, but structural rust in critical areas makes a car unsafe and expensive to repair properly. Get down on your knees with your flashlight and inspect the rocker panels, wheel wells, and undercarriage where rust hides from casual buyers. Push against rusty areas with your finger to see if metal flakes away easily, which indicates active corrosion eating through the metal.
Rust never sleeps, and once it starts in structural areas, it spreads and compromises the entire vehicle frame.
Critical rust inspection points:
- Rocker panels beneath the doors (structural support)
- Inside wheel wells behind plastic liners (pull back gently)
- Around fuel filler door and drain holes
- Rear door sills and trunk floor (check spare tire well)
- Frame rails visible from underneath
- Suspension mounting points (especially in salt-belt states)
Inspect tire condition and tread depth
Your tires tell you how the previous owner drove and maintained the vehicle. All four tires should show even wear across the tread without bald spots, bulges, cracks in the sidewalls, or exposed cords. Uneven wear patterns reveal alignment problems, suspension issues, or chronic underinflation that damaged the tire structure, and replacing all four tires adds $400 to $800 to your purchase cost.
Measure tread depth using your gauge or the penny test by inserting a penny into the tread groove with Lincoln's head upside down. If you see the top of Lincoln's head, the tire has less than 2/32 inch of tread remaining and needs immediate replacement. Check tread depth in multiple spots across each tire because uneven wear means one section might be dangerous while another looks acceptable.
Inspect the interior and electronics
The cabin reveals how the previous owner treated the vehicle daily and whether mechanical systems function properly. You need to test every switch, button, and feature systematically because replacing failed electronics or worn interior components adds hundreds to thousands in unexpected costs. These used car inspection tips for the interior help you spot abuse, neglect, or hidden electrical problems that the seller might dismiss as minor issues.
Check seats, upholstery, and wear patterns
Your seats and interior surfaces show honest wear that corresponds to the odometer reading. A car with 50,000 miles should have minimal wear on the driver's seat bolster and steering wheel, but if you see heavy wear, tears, or collapsed cushions, either the odometer was rolled back or the previous owner drove aggressively. Sit in the driver's seat and adjust it through its full range of positions to ensure the motor and tracks work smoothly without grinding or sticking.
Interior wear inspection points:
- Driver's seat bolster and cushion (should match mileage)
- Steering wheel grip (worn leather indicates high mileage)
- Pedal rubber condition (excessive wear means odometer tampering)
- Headliner sagging or staining (water leaks from sunroof)
- Carpet dampness or musty smell (flood damage or leak)
- Door panel switches and armrests (cracked or broken parts)
- Center console and cupholders (sticky residue or damage)
Sniff carefully for musty, moldy odors that indicate water intrusion from leaks or flood damage. Check the carpet under the floor mats by pressing firmly to feel for dampness, especially in the footwells and trunk where water pools after heavy rain. Pull back the trunk carpet and examine the spare tire well for rust or water stains that confirm chronic leaking.
Test every electronic system methodically
You should turn on the ignition without starting the engine first and watch the dashboard. All warning lights (check engine, ABS, airbag, oil pressure, battery) should illuminate for a few seconds then extinguish, proving the bulbs and systems function correctly. Sellers sometimes remove bulbs to hide warning lights, so if certain lights never appear, that's a major red flag requiring immediate investigation.
A seller who removes dashboard warning lights is deliberately hiding expensive problems you'll inherit after purchase.
Start the engine and test every electronic feature individually while taking notes. Roll down each window fully, then back up to listen for slow motors or grinding sounds. Turn on the air conditioning and heat to maximum settings while checking airflow from all vents. Test the radio, navigation system, backup camera, sunroof, power seats, mirrors, and any other features listed in the vehicle specifications.
Electronics testing checklist:
- All power windows (up and down smoothly)
- Power door locks (all doors lock and unlock)
- Climate control (hot air, cold air, fan speeds)
- Audio system (radio, Bluetooth, USB connections)
- All exterior lights (headlights, signals, brake lights)
- Windshield wipers and washer fluid spray
- Horn functionality
- Backup camera and parking sensors
- Dashboard gauges (all needles move correctly)
Look under the hood and under the car
You need to open the hood and examine the engine bay even if you lack mechanical expertise because basic visual checks reveal major problems that cost thousands to repair. The engine compartment shows whether regular maintenance was performed through fluid conditions, belt wear, and overall cleanliness. Pop the hood release (usually located under the dashboard on the driver's side) and prop it open with the safety rod, then step back to look for obvious leaks, missing parts, or amateur repair work like zip-tied hoses or mismatched clamps.
Check fluid levels and conditions
You should inspect every fluid while the engine is cold to get accurate readings and avoid burns from hot components. Pull each dipstick slowly, wipe it clean with your paper towel, reinsert it fully, then remove it again to read the actual level. The oil should appear amber or light brown between the minimum and maximum marks, but if you see black, gritty oil or a milky appearance (indicates coolant mixing with oil from a blown head gasket), you're looking at serious engine damage.
Critical fluids to check:
- Engine oil (color, level, and consistency)
- Transmission fluid (should be pink or red, not brown or burnt-smelling)
- Coolant (bright green, orange, or pink in the overflow reservoir)
- Brake fluid (clear or light amber, not dark or cloudy)
- Power steering fluid (pinkish red and at proper level)
- Windshield washer fluid (blue and full)
Check the coolant overflow tank for rust particles, oil floating on top, or the wrong color that indicates mixing or neglect. Low fluid levels across multiple systems suggest chronic leaks or an owner who ignored basic maintenance, both red flags that predict expensive failures soon after purchase.
Fluid condition tells you more about engine health than any sales pitch, revealing maintenance habits and hidden mechanical problems.
Inspect belts, hoses, and battery
Your serpentine belt drives critical systems like the alternator, power steering, and air conditioning, so you need to examine it closely for cracks, glazing, or fraying edges that signal imminent failure. Squeeze accessible coolant hoses near the radiator and engine to feel for soft spots, bulges, or brittleness that means they'll burst under pressure. A good hose feels firm but pliable, while a failing hose feels either mushy or rock-hard and cracked.
Look at the battery terminals for corrosion (white, blue, or green crusty buildup) and check the battery manufacture date printed on a sticker. Most batteries last three to five years, so if the current battery is six years old or shows heavy corrosion, factor in a $150 to $200 replacement cost.
Look underneath for leaks and damage
You must get down on the ground with your flashlight and inspection mirror to see what the undercarriage reveals. Slide under the front and rear of the vehicle to examine the exhaust system, suspension components, and frame for rust, damage, or fresh fluid leaks. Active leaks show wet spots or drips, while old leaks leave crusty residue or stains on metal surfaces.
Undercarriage inspection points:
- Oil pan and transmission for fresh leaks (dark brown or red)
- Exhaust system for holes, excessive rust, or hanging parts
- CV boots on front-wheel-drive cars (torn boots leak grease)
- Shock absorbers for oil leaking down the strut body
- Frame rails for bends, cracks, or poor accident repairs
Test drive it like you plan to own it
You need to drive the car exactly as you would every day, not just around the block at slow speeds like many buyers do. A proper test drive reveals problems that static inspections miss, including transmission issues, alignment problems, brake performance, and engine behavior under real-world conditions. Request at least 20 to 30 minutes behind the wheel so you can test highway speeds, stop-and-go traffic, parking maneuvers, and various road surfaces. If the seller refuses an adequate test drive or pressures you to keep it short, walk away immediately because they're hiding something.
Start with a cold engine and listen carefully
You should arrive before the seller starts the engine so you can perform a cold start test. A cold engine reveals starting problems, rough idling, and abnormal sounds that warm engines hide. Turn the key and pay attention to how quickly the engine catches and whether it cranks multiple times before starting. The engine should fire up within one to two seconds and settle into a smooth, steady idle without excessive shaking or vibration.
Listen for knocking, ticking, or squealing sounds that indicate worn bearings, valve problems, or failing belts. Let the engine run for two to three minutes while you monitor the temperature gauge and watch for smoke from the exhaust. White smoke usually means coolant burning (head gasket failure), blue smoke indicates oil consumption, and black smoke suggests fuel system problems.
Test acceleration, braking, and handling
Your test drive should include firm acceleration from a stop and highway merge speeds to check transmission shifting and engine power. The transmission should shift smoothly through all gears without hesitation, slipping, or hard clunks that signal internal damage. Accelerate briskly to highway speed while listening for unusual engine noises, vibrations, or loss of power that indicates problems.
Critical test drive checklist:
- Accelerate hard from 0 to 60 mph (transmission shifts smoothly)
- Brake firmly from highway speed (no pulling, pulsating, or squealing)
- Make tight turns at slow speed (listen for CV joint clicking)
- Drive over bumps and rough pavement (suspension noise or harshness)
- Release the steering wheel briefly on straight road (pulls left or right)
- Test cruise control and all gear selections (including low gears)
Brake hard several times from 45 to 50 mph to test stopping power and pedal feel. The car should stop straight without pulling to one side, and the brake pedal should feel firm and responsive, not soft or spongy which indicates air in the brake lines or failing components. Any vibration through the pedal means warped rotors that need replacement.
A test drive that includes highway speeds, hard braking, and various road conditions reveals problems that gentle neighborhood cruising never will.
These used car inspection tips for test driving give you confidence that the vehicle performs properly in real driving conditions, not just when sitting still in a parking lot.
Wrap it up and buy with confidence
These used car inspection tips give you the knowledge to evaluate any vehicle systematically and spot problems before they become your financial burden. You now know how to check vehicle history reports, inspect body panels and fluids, test electronics thoroughly, and perform a comprehensive test drive that reveals hidden issues sellers hope you'll overlook during a quick walk-around.
No personal inspection replaces a professional pre-purchase inspection by a trusted mechanic, especially for cars outside your mechanical comfort zone. Spending $100 to $200 for an expert evaluation with lift access and diagnostic tools can save you thousands in repairs you didn't see coming, and most independent shops complete inspections within an hour.
At Certified AutoBrokers, every vehicle we sell undergoes rigorous inspection because we understand what matters to buyers. Browse our inventory of inspected used cars in Grand Island, NY and buy with confidence knowing each vehicle meets our certification standards before it reaches our lot.